
Home › Logic Pro Plugins › Roland ZENOLOGY Pro

Roland ZENOLOGY Pro 2.0.7 (Mac)
Updated
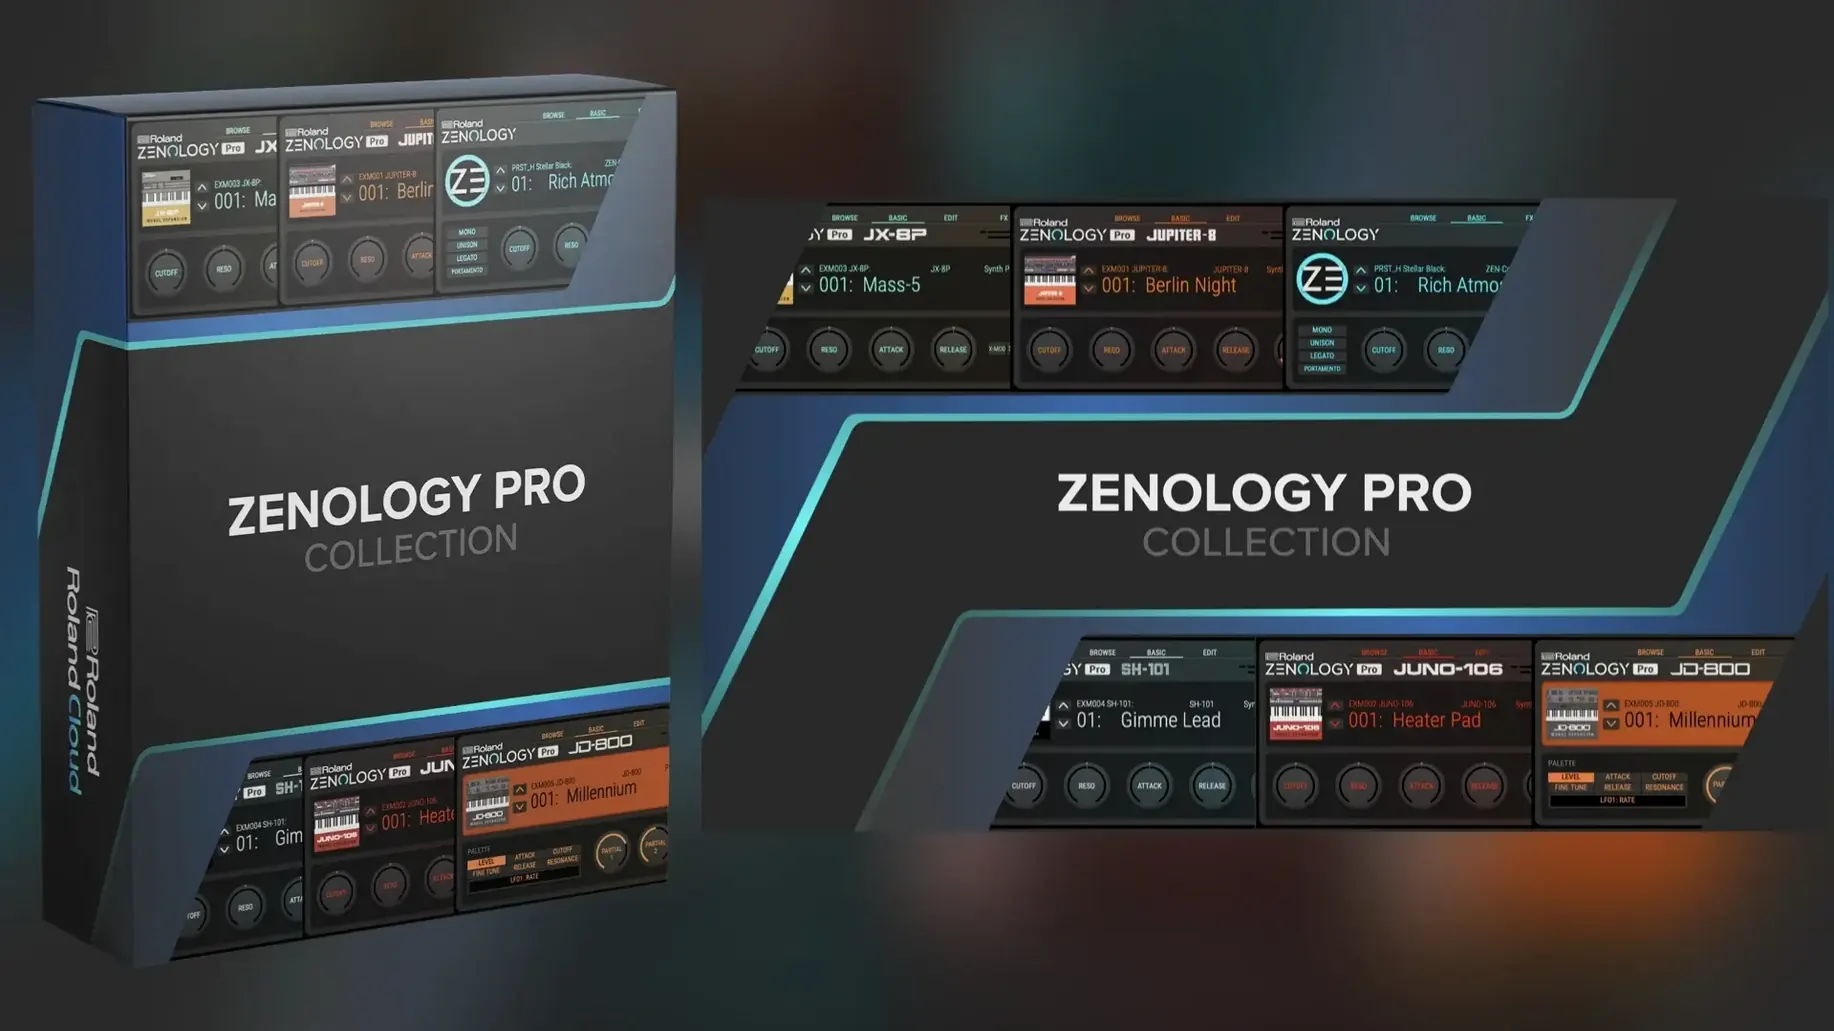
The catalogue note
Roland ZENOLOGY Pro is an expandable software synthesizer that brings the ZEN-Core architecture from JUPITER-X and FANTOM hardware into a Mac DAW.
Four-part tone architecture — each of the four parts in a tone has its own oscillator, filter, amplifier, two LFOs, and EQ. This is where the sound shaping happens, not unlike working with four separate synths layered into one patch.
Oscillator section — the starting point for every sound. ZEN-Core waveforms are the palette; you pick one and shape it through the filter and amp stages downstream.
Filter and amplifier — the filter cuts or emphasises frequencies; the amplifier controls volume contour via an envelope. Standard subtractive synthesis tools, but they respond differently depending on the waveform and how you set the two LFOs.
Two LFOs per part — modulation sources for pitch, filter cutoff, amplitude, or other targets. You can route them independently, which gives each part its own rhythmic or timbral movement.
More than 90 Roland effects — reverb, delay, chorus, distortion, and others sit after the synth engine. They are the same effects found in Roland hardware, so the sound stays consistent when moving between the plug-in and a hardware ZEN-Core instrument.
Tone browser — browse, audition, and tag favourite sounds. Custom banks let you organise patches by project or genre without digging through the full library.
Expandable via Sound Packs and Wave Expansions — the factory library is a starting point. Roland Cloud offers additional content that slots into the same architecture, bringing the total possible variations past ten thousand.
Star filter hides all but your favourite tones
A few details in ZENOLOGY Pro do not announce themselves loudly but save time once you know they are there. The tone browser can be set to show only your favourite sounds by clicking the star filter, which is quicker than scrolling through four thousand patches. Custom banks work the same way: once you drag a tone into a bank, it stays there even after you load a different project, so your curated lists persist between sessions.
The interface resize is worth checking early. Drag the corner of the window to any size, and all elements scale proportionally. This matters on smaller screens where the default layout can feel cramped, and on large displays where you might want the controls spread out. No restart or preference toggle is needed.
When you find a tone you like, the part structure lets you mute or solo individual layers from the main panel. This helps isolate what each oscillator and filter is doing without building a separate patch. If a sound feels too thick, solo each part to hear where the overlap is, then adjust the filter or level on that part only.
The waveform browser inside the oscillator section shows the PCM list grouped by category. You can preview a waveform by clicking it while a note plays, which avoids loading and unloading tones just to hear a different wave shape.
Roland Cloud sync failure stops the plug-in appearing
ZENOLOGY Pro relies on Roland Cloud for authorisation. If the plug-in does not appear in your DAW after installation, the most common cause is that the Roland Cloud application is not running or has not completed its sync. Open Roland Cloud, check that the plug-in shows as installed, and restart your DAW. On rare occasions, a Mac restart is needed for the audio unit registration to take effect.
Some users report that the plug-in loads but produces no sound. This usually happens when the MIDI channel assigned to the track does not match the part you are playing. Each part in ZENOLOGY Pro has its own MIDI channel setting; if you are working with a single tone, make sure the part you are editing is set to receive on the same channel your DAW sends. The part selector is visible in the main interface, and the channel is shown next to it.
If a new pack is missing from the list, close ZENOLOGY Pro, install the content via Roland Cloud, then reopen the plug-in. The browser refreshes only when the plug-in launches.
When working with hardware ZEN-Core instruments, the plug-in can edit and share sounds, but the transfer method depends on your hardware model. JUPITER-X and FANTOM users typically connect via USB and use Roland Cloud's librarian tools. The plug-in itself does not handle the transfer; the librarian software does. If the plug-in and hardware show different sound lists, sync them through the librarian before saving.
Four-layer architecture vs Pigments and other Mac synths
ZENOLOGY Pro sits in a particular space: it is not a modular environment, nor is it a simple preset player. Here is how it stacks up against two other Mac-native synths.
Arturia Pigments offers a similar four-layer architecture, but its oscillators lean heavily on wavetable and granular synthesis alongside virtual analog. Pigments has a more modern, graphic modulation matrix and a larger library of wavetables out of the box. ZENOLOGY Pro counters with the ZEN-Core PCM waveform set and direct compatibility with Roland hardware. If you own a JUPITER-X or FANTOM, the plug-in extends that ecosystem; Pigments does not. For pure sound design flexibility, Pigments gives you more oscillator types, but ZENOLOGY Pro's filter models, including the JUPITER filters, are harder to replicate elsewhere.
Native Instruments Massive X is a single-part synth with a deep modulation system and a distinctive spectral shaping section. It is more focused than ZENOLOGY Pro — you build one complex sound rather than layering four parts. Massive X excels at aggressive, evolving patches, while ZENOLOGY Pro covers broader territory with its multi-part tones and effects chain. The trade-off is that Massive X's single part can be modulated more intricately, whereas ZENOLOGY Pro's four parts each have their own modulation paths that are simpler per part but additive across the whole tone.
Neither Pigments nor Massive X offers the same direct integration with Roland hardware. If your studio includes a Roland keyboard, the plug-in becomes a sound editor and librarian that also runs standalone in your DAW. Without that hardware, the choice comes down to whether you prefer ZEN-Core's character and effects or the more experimental oscillator engines of Pigments and Massive X.
Build a layered pad from an empty patch in four parts
This sequence takes you from an empty patch to a finished pad using the four-part architecture.
- Open ZENOLOGY Pro on a MIDI track in your DAW. The default tone is usually a basic piano or synth; clear it by loading an init patch or by selecting a tone and resetting the part parameters manually.
- Set part 1 to a virtual analog waveform, such as a sawtooth or triangle. Dial in a slow filter envelope with a long attack and sustain at a medium level. Route LFO 1 to filter cutoff at a shallow depth, with a slow rate around 0.1 Hz. This creates the warm, breathing layer.
- Set part 2 to a PCM waveform from the string or pad category. The PCM SYNC option can lock the waveform phase for a more consistent tone. Use a different filter type — try the JUPITER low-pass — with a similar but slightly shorter envelope. Pan this part left of centre.
- Set part 3 to a Supersaw oscillator. Reduce the level by 6 dB so it blends rather than dominates. Apply LFO 2 to the pitch of this part at a very shallow depth, producing a subtle detune effect. Pan this part right of centre.
- Set part 4 to a noise oscillator or a breath-like PCM waveform. Filter it aggressively with a high-pass set around 300 Hz, then add a short reverb from the effects section. Keep the level low — this layer adds air, not body.
- Add a global reverb effect and a delay effect from the 90-plus effects list. Set the reverb to a hall or plate with a decay around three seconds. This glues the four parts together.
- Save the tone to a custom bank. Name it with a project tag so you can find it later. The browser will show it in your bank without needing to search the factory library.
The result is a pad that has movement from the LFOs, width from the panning, depth from the reverb, and texture from the four different oscillator types. Each part stays editable independently, so if the Supersaw layer is too bright, you can reduce its filter cutoff without touching the other parts.
Stacking similar waveforms drowns the sound
The most common error is treating the four parts as four separate synths that must all be used. A simple two-part tone can sound better than a four-part one where every layer fights for space. Beginners often stack similar waveforms across all parts, which creates phase cancellation or a muddy low end. Start with one or two parts, then add more only if the sound needs it.
Another mistake is ignoring the PCM SYNC option. When a PCM waveform is used without sync, the playback start point can vary each time you hit a note, causing an inconsistent attack. For percussive sounds this may be desirable, but for pads and leads, enabling PCM SYNC keeps the waveform starting from the same point every time, giving a stable tone.
Some users load a Sound Pack and expect all its tones to appear automatically in the browser. As mentioned above, the plug-in refreshes its list only at launch. If you install new content while the plug-in is open, close and reopen it. The same applies to Wave Expansions: they add new PCM waveforms, which appear in the oscillator waveform browser, not in the tone list.
Finally, the effects section is powerful, but beginners sometimes pile on reverb and delay on every part individually instead of using the global effects. This eats CPU and can smear the sound. Use the part-level effects sparingly — a touch of chorus on one part, a short delay on another — and let the global reverb handle the overall space. The plug-in has more than 90 effects, but using three well-chosen ones beats using ten at once.
Before it goes on the Mac
- macOS 11 or later
- Apple Silicon or Intel 64-bit processor
Questions from the room
What is the difference between ZENOLOGY and ZENOLOGY Pro?
The standard ZENOLOGY plug-in offers the core ZEN-Core sounds in a streamlined interface. ZENOLOGY Pro adds multi-part tones (up to four parts per tone) and deeper control over each synthesis stage.
Which Mac hardware does ZENOLOGY Pro support?
ZENOLOGY Pro 2.0.7 runs natively on both Apple Silicon and Intel 64-bit Macs. macOS 11 or later is required.
Installing it on the Mac
- Mount the downloaded disk image.
- Run the standard installation procedure.
Notes from the control room
Sign in or open a catalogue account to leave a note.
No notes from the room yet. If you have used this build for a week, a short note helps the next person.
Also filed under Logic Pro Plugins
The whole Logic Pro Plugins rack Roland Cloud Legendary Series2025.06.29 Logic Pro Plugins 1.3 GB
 Safari Pedals Everything Bundle2026.05 Logic Pro Plugins 628 MB
 Revoice Pro5.1.30 Logic Pro Plugins 39 MB
 Scaler 33.3.2 Logic Pro Plugins 1.4 GB
 RC-20 Retro Color1.5.1 Logic Pro Plugins 170 MB
 Serato Hex FX1.2.0 Logic Pro Plugins 105 MB
 Serato Sample2.2.0 Logic Pro Plugins 612 MB
 Pulsar Audio Pulsar Primavera1.2.4 Logic Pro Plugins 103 MB