
Sweet Home 7.5.7 (Mac)
Updated
The catalogue note
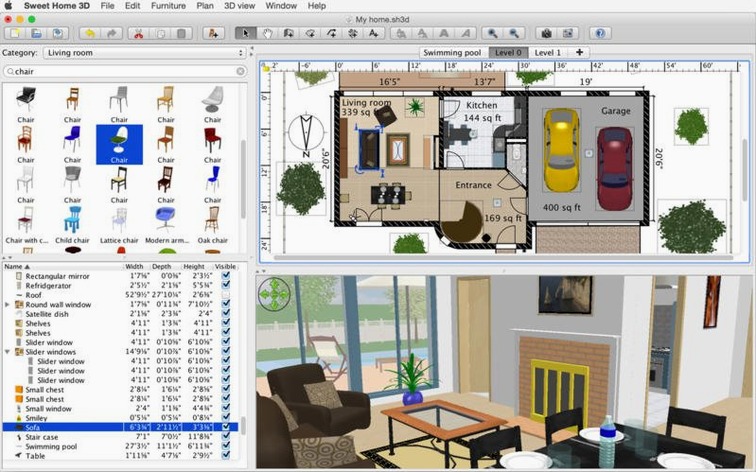
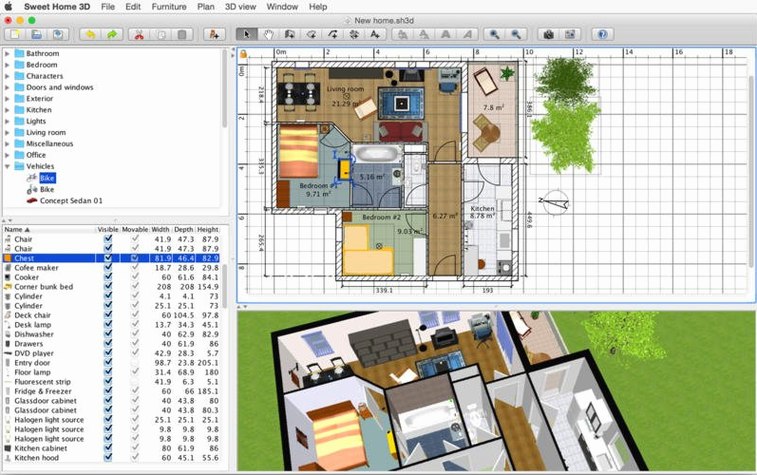
Drawing a home plan on paper gets messy the moment you add furniture. Sweet Home 3D addresses this issue through its ability to have walls and rooms drawn across one or multiple floors, after which you can toggle to a 3D perspective to observe the outcome from overhead or at a guest's eye height. It is a straightforward tool for anyone planning a renovation or laying out a new flat.
Runs on macOS 10.9 or later with Intel and Apple Silicon
Sweet Home 3D needs macOS 10.9 or later and runs on both Intel and Apple Silicon machines. That makes it a safe bet even on older hardware. The current version is 7.5.7, which fixes sync issues in the separate 3D view window and corrects rendering of underground levels at the same elevation.
Over 1,400 objects, photorealistic images, and video walkthroughs
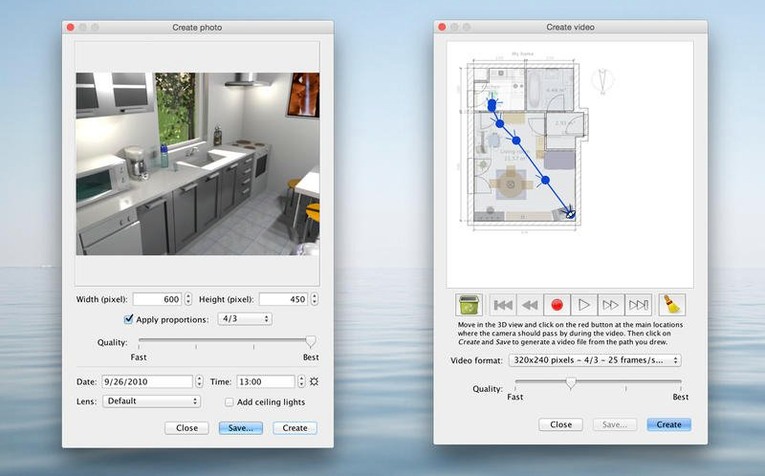
Beyond the basics, you can place doors, windows and furniture from a catalogue of over 1,400 objects, create photorealistic images with adjustable sun position, and export plans to PDF, PNG, JPEG, SVG or OBJ. There is also a video walkthrough feature for showing the space to someone else.
Workflow in steps
- Draw the outer walls on the 2D plan.
- Add interior partitions and rooms.
- Drop in doors and windows from the catalogue.
- Furnish each room, then switch to 3D to check proportions.
- Adjust lighting and export the scene or record a walkthrough.
No powerful Mac needed—works on modest machines from 10.9 onward
New users often wonder whether they need a powerful Mac to run Sweet Home 3D. The answer is no: the app runs on OS X 10.9 and later, and supports both Intel and Apple Silicon architectures. A modest machine from the past decade will handle basic plans and 3D views without trouble. The heavier tasks — photorealistic rendering and video walkthroughs — benefit from more RAM and a faster processor, but the app does not demand a workstation.
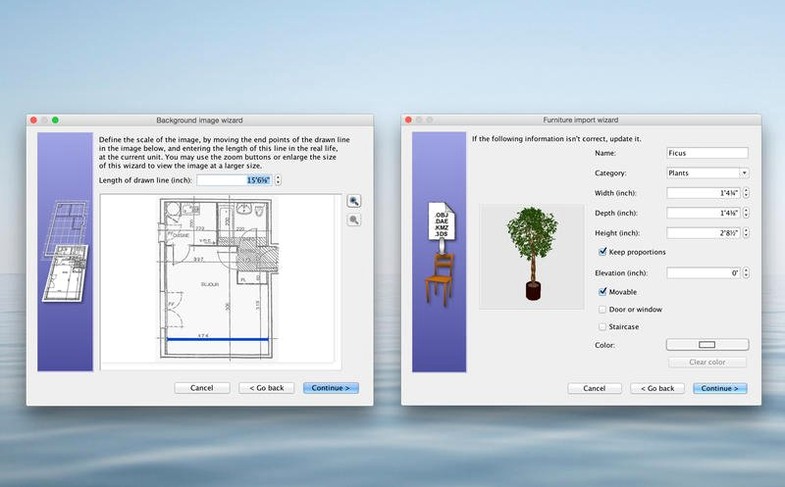
Another common question is whether you can import your own 3D models. Yes, Sweet Home 3D lets you import models you have created or downloaded from the internet. This is useful when the built-in catalogue of over 1,400 objects does not include a specific sofa, lamp or kitchen unit. The imported model can then be resized, rotated and recoloured like any catalogue piece.
Some people ask if the app works offline. It does. Once installed, no internet connection is required for drawing, furnishing or rendering. The catalogue and textures are stored locally. This is a practical detail for those working on a laptop without constant network access.
Sweet Home 3D helps you design floor plans and arrange furniture, making it ideal for beginners exploring "3d sweet home download". There is no need to look elsewhere.
Explore the interface in your language from 29 supported options
When you first launch Sweet Home 3D, take a few minutes to explore the interface in your preferred language. The app supports 29 languages, so you can switch to your native tongue from the preferences. This makes the learning curve noticeably gentler.
Start with a simple single-room plan before attempting a multi-storey project. Draw the outer walls first, then add interior partitions. This builds familiarity with the snapping guides and measurement tools. Once the walls are up, place a few doors and windows to see how they cut through the wall lines automatically.
Use the 3D view early and often. Switching between 2D and 3D after every few objects helps you understand how the app interprets your plan. The visitor viewpoint is especially useful: it places the camera at eye level inside the room, giving a realistic sense of scale that the aerial view does not provide.
When you start placing furniture, resist the urge to fill every room immediately. Place a few key items first, then rotate and resize them using the editing panel. You can change colour and texture for each piece individually. This is where the catalogue's range of over 1,400 objects becomes valuable — take time to browse categories rather than relying on the same few items.
Save your work early and often. Sweet Home 3D uses its own file format, and saving a plan after each significant change costs nothing. It also allows you to revert if a later edit does not work out.
Version 7.5 fixed 3D view sync issues in floating windows
Version 7.5 addressed two practical annoyances that affected regular users. The first was a synchronisation issue in the separate 3D view window. If you work with the 3D view in its own floating window — common on larger monitors or dual-screen setups — earlier versions sometimes fell out of sync with the 2D plan. That is now fixed, so moving a wall or shifting a piece of furniture updates both views consistently.
The second fix concerns underground levels at the same elevation. The 3D rendering previously showed these areas inaccurately when creating a basement or a split-level floor plan. Version 7.5 corrected the rendering, so underground rooms now appear at the correct height relative to the ground floor. This matters for anyone planning a house with a walk-out basement or a garage partially below grade.
There was also a smaller but welcome fix for the Thai interface font display. If you work in Thai, the text now renders without missing glyphs or alignment issues.
These changes do not add new features, but they remove friction from tasks that experienced users encounter daily. The overall workflow remains the same: draw, furnish, render, export. The difference is that the tools now behave as expected in edge cases that previously required workarounds.
Draw outer walls of a two-bedroom apartment on the 2D grid
I open Sweet Home 3D and start a new plan. The first task is to draw the outer walls of a two-bedroom apartment. I click and drag on the 2D grid, snapping to the measurement guides. The walls appear as thick lines, and the app automatically calculates room areas as I close each shape.
Once the shell is ready, I add interior partitions to define the bedrooms, bathroom, kitchen and living area. I place doors in the walls by selecting a model from the catalogue and dragging it onto the plan. The app cuts the wall opening automatically, saving the manual measuring and erasing I would need on paper. Windows go in the same way, positioned along exterior walls.
With the structure complete, I switch to the 3D view from an aerial angle to check proportions. The rooms look plausible, so I continue. I browse the furniture catalogue for a sofa, a dining table and chairs, beds and a kitchen counter. Each item is dragged into its room on the 2D plan. I use the editing panel to adjust sizes and rotate pieces so they fit the layout. The 3D view updates in real time, which helps me spot a table that is too large for the dining area before I finalise it.
Next, I change wall colours and floor textures. The app provides a selection of materials, and I apply a light grey to the walls and a wood tone to the living room floor. In the bathroom, I choose a tile pattern. The 3D view now shows a reasonably realistic interior.
I adjust the sun position to see how natural light falls through the windows at different times of day. This is done through the light and rendering settings. I create a photorealistic image of the living room to share with someone who wants to see the final look. The render takes a moment, but the result is detailed enough to judge the colour scheme.
Finally, I export the plan to PDF for printing and save the 3D view as a PNG image. The session ends with a saved project file that I can reopen later if I need to make changes or add more furniture.
The interface is available in 29 languages, including English, German, French, Polish and Japanese, so most users will find a comfortable setting.
Changes in this build
- Fixed synchronisation issues in the separate 3D view window.
- Corrected 3D rendering of underground levels at the same elevation.
- Fixed font display in the Thai interface.
Before it goes on the Mac
- macOS 10.9 or later
- Intel or Apple Silicon
Installing it on the Mac
- Mount the disk image and open the app; if macOS blocks it, run
Open Gatekeeper friendly. - Press Enter in Terminal to bypass Gatekeeper.
- Drag the app to the Applications folder.
- The app is ready to use.
Notes from the control room
Sign in or open a catalogue account to leave a note.
No notes from the room yet. If you have used this build for a week, a short note helps the next person.
Also filed under Mac Apps
The whole Mac Apps rack Super Vectorizer Pro2.4.0 Mac Apps 8 MB Updated
 TablePlus6.8.0 Mac Apps 91 MB
 Sublime Text4.0 Mac Apps 54 MB
 Termius9.35.4 Mac Apps 220 MB
 Things3.24.2 Mac Apps 37 MB Updated
 Sound Siphon3.8.4 Mac Apps 17 MB
 Topaz Gigapixel AI1.5.0 Mac Apps 372 MB Updated
 SketchUp Pro27.0.277 Mac Apps 1.6 GB Updated