
Home › Mac Apps › Adobe Dimension

Updated
The catalogue note
Graphic designers and branding professionals working on product mockups, packaging visuals, or concept renders reach for Adobe Dimension when they need a straightforward way to combine 2D artwork with 3D scenes. The interface is built for people who do not come from a 3D background, so placing a logo onto a model or adjusting lighting stays practical rather than academic.
What kind of work does it handle?
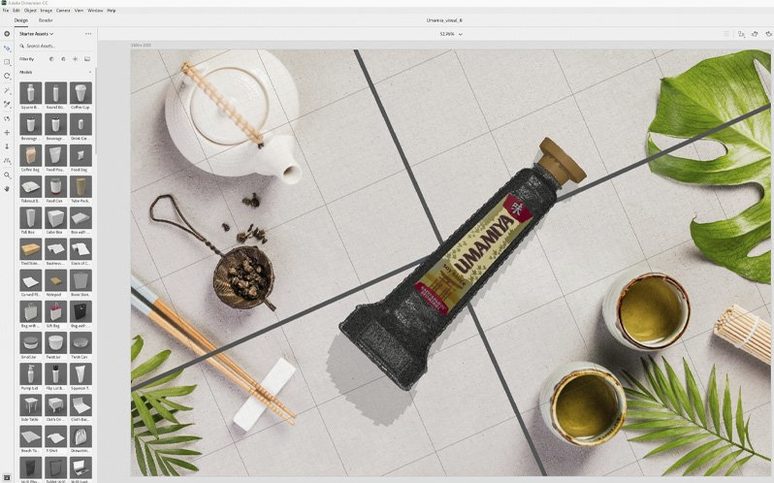
Dimension lets you create, adjust, and render photorealistic images in a single application. You can drop vector artwork onto 3D models, build brand visualisations, and export finished scenes as layers for continued work in Photoshop CC. The current release, version 4.1.7, is a supported product that receives regular security updates — Adobe released this build on 21 January 2026.
What do people ask before running it on a Mac?
The app requires macOS 11 or later and runs on Intel-based Macs. Apple Silicon machines are not listed as supported in this version. The package includes install and activation instructions, so there is no separate licence file to hunt for.
Set rendering quality to mid-value for layout work
When you first open Dimension, the defaults are reasonable for general use, but a couple of adjustments save time on real projects. The rendering quality slider lives in the preferences — setting it to a mid value during layout work keeps viewport response quick, then you bump it to maximum for final output. The scene canvas resolution also defaults to a standard screen size; matching it to your final export dimensions from the start avoids re-lighting or repositioning later.
Auto-save interval is another candidate. The default is fine for casual use, but if you work with large stock models or complex materials, shortening the interval reduces the risk of losing material assignments after an unexpected quit. The preferences panel is straightforward to navigate, so these changes take about thirty seconds.
Export layers for direct editing in Photoshop CC
You build the scene, apply materials and lighting, then export as layers that open directly in Photoshop CC. This means text layers, vector shapes, and adjustments remain editable in Photoshop rather than flattening into a single raster image. Branding teams often use this path: create the product mockup in Dimension, then add copy and final colour grading in Photoshop without re-rendering.
On the macOS side, the app respects standard file management conventions. You can save scenes to iCloud Drive or any network volume, though large model files benefit from local storage during active work. Drag and drop works from Finder — you can pull an Adobe Stock 3D model or an SVG logo directly onto the canvas. The system colour picker and font panel are available when working with materials or text overlays, keeping the experience consistent with other Mac apps.
For users who browse 3D assets directly through the app, the built-in Adobe Stock browser returns models optimised for Dimension's material system. These assets come with pre-assigned surface properties, so you spend less time tweaking reflectivity or roughness. If you already have models from other sources, the import dialogue accepts common formats without additional converters.
Auto-match background perspective and lighting
- Background image matching — When you import a photo as a background, Dimension can analyse its perspective and lighting, then adjust the scene camera and scene lights automatically. This is not a toggle you see every day, but it saves minutes when compositing a product into a real environment.
- Material preview thumbnails — The material browser shows small previews that update as you browse. You can see the rough visual effect of a brushed metal or matte plastic before applying it to your model.
- Scene organisation panel — A hierarchical list of every object, light, and camera in the scene. You can rename items, reorder them, and toggle visibility — useful when a scene has a dozen different product variations.
- Export presets — The render dialogue remembers your last settings, but you can also save named presets for different output sizes or quality levels. Handy when you render the same scene for social media, print, and web in sequence.
Create a tea package scene with natural daylight from a window
You start with a brief: a new packaging concept for a tea brand. The client wants the box placed on a wooden table, with natural daylight from a window. You open Dimension and choose a new scene. The default grey canvas is replaced by a background image — a photograph of a table surface you took earlier. The app asks if you want to match the background perspective; you accept, and the scene camera adjusts automatically.
Next, you search Adobe Stock for a tea box model. The built-in browser returns several options; you pick one that has a flat front surface suitable for label artwork. The model loads with its materials intact. You position it on the table plane by dragging the on-screen widget — the shadow falls correctly because the background image already defines the light direction.
Now the branding. You export your logo from Illustrator as a vector file and drag it onto the box face in Dimension. The app asks whether you want to place it as a decal or a material layer. You choose decal, then adjust the scale and rotation handles until the logo sits where the client wants it. The lighting on the decal matches the rest of the scene immediately — no manual shadow tweaking.
You duplicate the box twice to show three flavour variants, each with a different label colour. The scene organisation panel helps you keep track: each box is named, grouped, and its material assignment visible at a glance. You tweak the background exposure slightly using the environment controls, then set the render quality to maximum and export as a layered Photoshop document.
Back in Photoshop, the layers are separated — background, boxes, shadows, and lighting each on their own layer. You add the product name in a clean sans-serif typeface, adjust the contrast curve, and save the final comp. The entire session, from empty canvas to deliverable, takes under an hour because you never had to fight the 3D engine.
Changes in this build
- Resolved security vulnerabilities.
Before it goes on the Mac
- macOS 11
- Intel architecture
Questions from the room
Does Adobe Dimension work on Apple Silicon Macs?
Adobe lists Intel architecture for this version. Apple Silicon is not mentioned in the system requirements for 4.1.7.
Can I continue working on a Dimension scene in Photoshop?
Yes. Dimension can export scenes as layers for further editing in Adobe Photoshop CC.
What languages does the interface support?
English, German, Spanish, Italian, French, Portuguese, Japanese, Simplified Chinese, and Korean.
Installing it on the Mac
- Install instructions are included in the package.
- Activation instructions are included in the package.
Notes from the control room
Sign in or open a catalogue account to leave a note.
No notes from the room yet. If you have used this build for a week, a short note helps the next person.
Also filed under Mac Apps
The whole Mac Apps rack Adobe Dreamweaver21.8.0 Mac Apps 3.2 GB
 Adobe Illustrator30.8.2 Mac Apps 3.4 GB
 Adobe InDesign22.0.0 Mac Apps 1.9 GB Updated
 Adobe Acrobat Pro26.002.21901 Mac Apps 3.1 GB
 Adobe Lightroom Classic15.6.0 Mac Apps 3.7 GB
 Adobe Photoshop28.0.0 Mac Apps 3.5 GB Updated
 Adobe Premiere Rush1.5.62 Mac Apps 1.6 GB
 ACDSee Photo Studio26.0.3 Mac Apps 441 MB